
Dieser Beitrag ist zuerst auf Deutsch verfügbar. Jump to the English version.
Wichtig: Die Installation zusätzlicher Softwarekomponenten auf Azure Local kann den Zustand und Support der Umgebung gefährden. Dies muss vorher sorgsam abgewägt werden!
Auf einem Azure-Local-Cluster ließ sich der Checkmk-Agent nicht per MSI installieren. Der Installer wurde als Administrator gestartet, die Datei war vorhanden und der Aufruf von msiexec sah korrekt aus – trotzdem erschien der Agent anschließend nicht als installierte Anwendung.
Die Ursache war nicht Checkmk und auch kein beschädigtes MSI-Paket. Azure Local führte die Application-Control-Richtlinie im erzwungenen Modus aus. Dadurch wurde nicht vertrauenswürdiger Code blockiert. Gelöst wurde das Problem mit einer ergänzenden WDAC-Richtlinie für den Checkmk-Agenten. Die bestehende Azure-Local-Basisrichtlinie blieb dabei aktiv.
Wichtig: Die Befehle in diesem Beitrag verändern die Code-Integrity-Konfiguration eines Clusters. Sie sollten zuerst in einer Wartungsphase und mit einem getesteten Rückweg ausgeführt werden. Der Audit-Modus erlaubt Code, der im erzwungenen Modus blockiert würde.
Das Fehlerbild
Der unbeaufsichtigte Installationsaufruf war grundsätzlich korrekt:
msiexec.exe /i "C:\WDAC\Checkmk\check-mk-agent_2.5.0p12.msi" /quiet /norestartNach dem Aufruf war der Agent jedoch nicht installiert. Ein erneuter Start mit administrativen Rechten änderte nichts. Ein Aufruf ohne /quiet zeigt dann immerhin einen konkreteren Fehler:
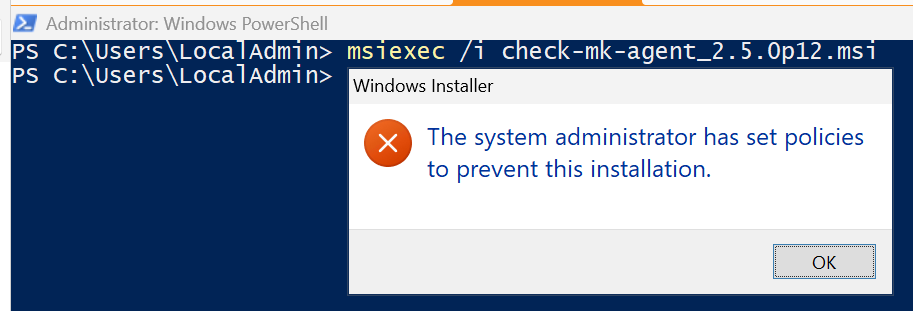
Der Fehlertext lautet: “The system administrator has set policies to prevent this installation.”
Genau an diesem Punkt lohnt es sich, nicht nur das MSI-Protokoll, sondern auch Application Control beziehungsweise Windows Defender Application Control (WDAC) zu prüfen.
1. Den WDAC-Status prüfen
Azure Local stellt eigene PowerShell-Cmdlets bereit, um den Richtlinienmodus und die lokal vorhandenen Richtlinien anzuzeigen:
Get-AsWdacPolicyMode

Get-ASLocalWDACPolicyInfo |
    Select-Object PolicyName, PolicyId, BasePolicyId, IsSignedPolicy, IsOnDisk, IsEnforced |
Format-Table -AutoSizeSteht der Modus auf Enforced, kann WDAC den Installationsvorgang oder vom Installer gestartete Binärdateien blockieren.
Relevante Ereignisse kompakt auslesen
Ausführbare Dateien, DLLs und Treiber werden üblicherweise im Code-Integrity-Protokoll erfasst. MSI- und Skript-Ereignisse können im AppLocker-Protokoll erscheinen. Auf Server Core ist das AppLocker-Protokoll für MSI und Skripte möglicherweise nicht vorhanden.
$StartTime = (Get-Date).AddMinutes(-30)
$EventIds = 3076, 3077, 3089, 8028, 8029, 8038
$Logs = @(
'Microsoft-Windows-CodeIntegrity/Operational'
'Microsoft-Windows-AppLocker/MSI and Script'
)
foreach ($Log in $Logs) {
if (-not (Get-WinEvent -ListLog $Log -ErrorAction SilentlyContinue)) {
Write-Warning "Event log is not available: $Log"
continue
}
Get-WinEvent -FilterHashtable @{
LogName = $Log
StartTime = $StartTime
Id = $EventIds
} -ErrorAction SilentlyContinue |
Where-Object {
$_.Message -match 'check[_-]?mk|cmk|msi'
} |
Sort-Object TimeCreated |
Select-Object TimeCreated, Id, LevelDisplayName, Message |
Format-List
}Die wichtigsten IDs für diesen Fall sind 3077 für einen Block im erzwungenen Modus und 3076 für das entsprechende Audit-Ereignis. Für MSI- und Skriptsteuerung sind insbesondere 8029 (Block) und 8028 (Audit) relevant.
2. Warum eine ergänzende Richtlinie?
Die Azure-Local-Basisrichtlinie einfach dauerhaft zu deaktivieren wäre keine gute Lösung. Eine ergänzende Richtlinie erweitert die erlaubte Codebasis gezielt. Basis- und ergänzende Richtlinie werden gemeinsam ausgewertet; die zusätzlich erlaubten Checkmk-Dateien müssen daher nicht in die von Microsoft bereitgestellte Basisrichtlinie eingebaut werden.
Für die Regelerzeugung wurde die Publisher-Ebene verwendet. Falls eine Datei keine verwertbare Signatur besitzt, greift -Fallback Hash. Das ist bewusst restriktiv: Eine neue, inhaltlich veränderte Datei hat einen anderen Hash und kann bei einem späteren Agent-Update eine aktualisierte ergänzende Richtlinie erfordern.
3. In den Audit-Modus wechseln
Im Beispiel wird der Modus clusterweit geändert. Enable-AsWdacPolicy wirkt auf alle Clusterknoten. Nach der Änderung sollte der Status auf jedem Knoten geprüft werden, bevor die Installation fortgesetzt wird.
Get-AsWdacPolicyMode
Enable-AsWdacPolicy -Mode Audit
Start-Sleep -Seconds 180
Get-AsWdacPolicyModeMicrosoft weist darauf hin, dass die Umschaltung zwei bis drei Minuten dauern kann. Für einen ausschließlich lokalen Test existiert außerdem Enable-ASLocalWDACPolicy; eine lokal abweichende Richtlinienlage muss anschließend aber bewusst wieder bereinigt werden.
4. Den Agenten auf einem Referenzknoten installieren
Das MSI wird nun im Audit-Modus installiert. Der folgende vollständige PowerShell-Block prüft die Datei und wertet den Exitcode von msiexec aus:
$MsiPath = 'C:\WDAC\Checkmk\check-mk-agent_2.5.0p12.msi'
if (-not (Test-Path -LiteralPath $MsiPath -PathType Leaf)) {
throw "MSI file not found: $MsiPath"
}
$Arguments = @(
'/i'
"`"$MsiPath`""
'/quiet'
'/norestart'
)
$Process = Start-Process -FilePath 'msiexec.exe' `
-ArgumentList $Arguments `
-Wait `
-PassThru
if ($Process.ExitCode -notin 0, 3010) {
throw "Checkmk MSI installation failed with exit code $($Process.ExitCode)."
}
Get-Service |
Where-Object { $_.Name -match 'check|cmk' -or $_.DisplayName -match 'checkmk' } |
Format-Table Status, Name, DisplayName -AutoSizeDer Exitcode 3010 bedeutet, dass die Installation erfolgreich war, aber ein Neustart erforderlich ist. Vor dem nächsten Schritt muss der Agent vollständig installiert und getestet sein.
5. Die ergänzende Checkmk-Richtlinie erzeugen und verteilen
Im Testsystem lag die Installation unter C:\Program Files (x86)\checkmk. Der Scanpfad muss an die tatsächlich installierte Version angepasst werden. Es sollte nur das notwendige Produktverzeichnis gescannt werden – nicht pauschal C:\ oder das gesamte Verzeichnis Program Files.
$PolicyDirectory = 'C:\WDAC\Checkmk'
$ScanPath = 'C:\Program Files (x86)\checkmk'
$PolicyPath = Join-Path $PolicyDirectory 'Checkmk-Agent-Supplemental.xml'
$PolicyName = 'Checkmk Agent Supplemental Policy'
$PolicyVersion = '1.0.0.0'
New-Item -Path $PolicyDirectory -ItemType Directory -Force | Out-Null
if (-not (Test-Path -LiteralPath $ScanPath -PathType Container)) {
throw "Checkmk installation directory not found: $ScanPath"
}
New-CIPolicy `
-MultiplePolicyFormat `
-Level Publisher `
-Fallback Hash `
-UserPEs `
-ScanPath $ScanPath `
-FilePath $PolicyPath
Set-CIPolicyVersion `
-FilePath $PolicyPath `
-Version $PolicyVersion
Set-CIPolicyIdInfo `
-FilePath $PolicyPath `
-PolicyID "Checkmk-Agent_$PolicyVersion" `
-PolicyName $PolicyName
Add-ASWDACSupplementalPolicy -Path $PolicyPath
Get-ASLocalWDACPolicyInfo |
Where-Object { $_.PolicyName -eq $PolicyName } |
Format-List PolicyName, PolicyId, BasePolicyId, IsSignedPolicy, IsOnDisk, IsEnforcedDie XML-Datei sollte versionskontrolliert und zusammen mit der verwendeten Agent-Version dokumentiert werden. Die erzeugte Policy-ID ist umgebungsspezifisch und darf nicht blind aus einem anderen System übernommen werden.
6. Die Supplemental Policy auf alle Clusterknoten verteilen und prüfen
Eine erfolgreiche Installation auf dem Referenzknoten beweist noch nicht, dass die ergänzende Richtlinie auf allen Clusterknoten aktiv ist. Im beschriebenen Lab war die Checkmk-Richtlinie zunächst nur auf AZLHOST01 vorhanden. Auf AZLHOST02 und AZLHOST03 fehlte sie, obwohl die Basisrichtlinie dort bereits im Modus Enforced arbeitete.
Deshalb wurde die bereits erzeugte XML-Datei auf AZLHOST01 erneut mit Add-ASWDACSupplementalPolicy bereitgestellt. Das Cmdlet verarbeitet alle Clusterknoten. Anschließend kontrolliert das Skript den Richtlinienmodus und fragt die Policy-ID auf jedem Knoten direkt über CiTool ab. Diese Kontrolle über die Policy-ID ist besonders hilfreich, wenn Get-ASLocalWDACPolicyInfo für eine eigene Richtlinie keinen Namen anzeigt.
$PolicyPath = 'C:\WDAC\Checkmk-2.5.0p12\Checkmk-Supplemental.xml'
$ExpectedPolicyId = 'd9c9bf97-3465-4afb-9714-b457f2341e61'
$ExpectedBasePolicyId = 'a6368f66-e2c9-4aa2-ab79-8743f6597683'
$ClusterNodes = @(
'AZLHOST01'
'AZLHOST02'
'AZLHOST03'
)
if (-not (Test-Path -LiteralPath $PolicyPath -PathType Leaf)) {
throw "WDAC policy file not found: $PolicyPath"
}
$PolicyContent = Get-Content -LiteralPath $PolicyPath -Raw
if ($PolicyContent -notmatch [regex]::Escape($ExpectedPolicyId)) {
throw 'The XML does not contain the expected supplemental policy ID.'
}
if ($PolicyContent -notmatch [regex]::Escape($ExpectedBasePolicyId)) {
throw 'The XML does not reference the expected Azure Local base policy.'
}
Add-ASWDACSupplementalPolicy `
-Path $PolicyPath `
-Verbose
Get-AsWdacPolicyMode
$PolicyStatus = Invoke-Command `
-ComputerName $ClusterNodes `
-ScriptBlock {
param($PolicyId)
$CiToolPath = Join-Path $env:SystemRoot 'System32\CiTool.exe'
$PolicyInventory = & $CiToolPath -lp -json | ConvertFrom-Json
$Policy = @(
$PolicyInventory.Policies |
Where-Object {
([string]$_.PolicyID).Trim('{}') -ieq $PolicyId
}
) | Select-Object -First 1
[pscustomobject]@{
Node = $env:COMPUTERNAME
PolicyFound = $null -ne $Policy
PolicyID = $Policy.PolicyID
BasePolicyID = $Policy.BasePolicyID
IsOnDisk = $Policy.IsOnDisk
IsEnforced = $Policy.IsEnforced
}
} `
-ArgumentList $ExpectedPolicyId
$PolicyStatus |
Select-Object Node, PolicyFound, PolicyID, BasePolicyID, IsOnDisk, IsEnforced |
Format-Table -AutoSize
$MissingNodes = @(
$PolicyStatus |
Where-Object {
-not $_.PolicyFound -or
-not $_.IsOnDisk -or
-not $_.IsEnforced
}
)
if ($MissingNodes.Count -gt 0) {
throw "The Checkmk supplemental policy is not active on every cluster node."
}Bei einer erfolgreichen Bereitstellung meldet die ausführliche Ausgabe für jeden neuen Knoten Refreshed and activated Code Integrity policy mit Status 0x0. Die abschließende Tabelle muss für alle Knoten PolicyFound, IsOnDisk und IsEnforced als True ausweisen. Erst danach sollte das Checkmk-MSI auf den übrigen Knoten installiert werden.
7. WDAC wieder erzwingen und die Installation testen
Sobald die ergänzende Richtlinie auf den Knoten vorhanden ist, wird die Basisrichtlinie wieder in den erzwungenen Modus versetzt:
Enable-AsWdacPolicy -Mode Enforced
Start-Sleep -Seconds 180
Get-AsWdacPolicyMode
Get-ASLocalWDACPolicyInfo |
Where-Object { $_.PolicyName -eq 'Checkmk Agent Supplemental Policy' } |
Format-List PolicyName, PolicyId, BasePolicyId, IsSignedPolicy, IsOnDisk, IsEnforcedDanach sollte der entscheidende Test unter Enforced erfolgen: Agent starten, Status prüfen und die MSI-Installation auf den übrigen Knoten wiederholen. Nur ein erfolgreicher Test im erzwungenen Modus zeigt, dass die ergänzende Richtlinie vollständig ist.
Get-Service |
Where-Object { $_.Name -match 'check|cmk' -or $_.DisplayName -match 'checkmk' } |
Format-Table Status, Name, DisplayName -AutoSize
$Controller = 'C:\Program Files (x86)\checkmk\service\cmk-agent-ctl.exe'
if (Test-Path -LiteralPath $Controller -PathType Leaf) {
& $Controller status
}Das Ergebnis im Lab
Im beschriebenen Cluster blieb die Azure-Local-Basisrichtlinie AS_Base_Policy aktiv. Ihre Policy-ID war a6368f66-e2c9-4aa2-ab79-8743f6597683. Ergänzt wurde sie durch die Richtlinie Checkmk Agent Supplemental Policy mit der Policy-ID d9c9bf97-3465-4afb-9714-b457f2341e61. Die ergänzende Richtlinie wurde auf dem Datenträger gefunden und als erzwungen gemeldet. Anschließend ließ sich check-mk-agent_2.5.0p12.msi installieren.
Diese GUIDs dokumentieren nur das konkrete Lab. Für eine neue Richtlinie werden eigene IDs erzeugt.
Nach der Installation: TCP/6556 nicht vergessen
Die erfolgreiche Installation bedeutet noch nicht, dass der Checkmk-Server den Agenten erreichen kann. Der klassische Checkmk-Agent benötigt eingehend TCP/6556. Der Installer legt normalerweise eine lokale Firewallregel an. In Umgebungen mit zentral verwalteten oder restriktiven Firewallrichtlinien kann trotzdem eine passende Gruppenrichtlinie erforderlich sein.
Im Lab war die Vererbung an der Azure-Local-OU deaktiviert. Eine weiter oben verknüpfte Firewall-GPO erreichte die Server deshalb nicht. Die Freigabe für TCP/6556 musste direkt an der Server-OU verknüpft werden. Danach konnte Checkmk den Agenten verbinden.
Die Firewall war ein separates Problem nach der Installation. Sie war nicht die Ursache dafür, dass WDAC das MSI beziehungsweise dessen Code zuvor blockierte.
Was bei Agent-Updates zu beachten ist
- Die Richtlinien-XML und die zugehörige Checkmk-Version gemeinsam dokumentieren.
- Neue Agent-Versionen zuerst auf einem Referenzknoten unter
Enforcedtesten. - Bei neuen Blockereignissen die ergänzende Richtlinie gezielt aktualisieren und versionieren.
- Den Audit-Modus nur so lange wie erforderlich verwenden.
- Firewall-GPO, OU-Verknüpfung und Sicherheitsfilterung ebenfalls nach Änderungen kontrollieren.
Fazit
Wenn eine MSI-Installation auf Azure Local scheinbar ohne Ergebnis endet, sollte WDAC früh in die Diagnose einbezogen werden. Der saubere Weg besteht darin, die Blockierung über die Ereignisprotokolle zu bestätigen, die Software kontrolliert im Audit-Modus zu installieren, aus dem eng begrenzten Installationsverzeichnis eine ergänzende Richtlinie zu erzeugen und anschließend wieder auf Enforced umzuschalten. So bleibt das Sicherheitsmodell von Azure Local erhalten, während der Checkmk-Agent gezielt zugelassen wird.
Quellen
- Microsoft Learn: Manage Application Control for Azure Local
- Microsoft Learn: Application Control event ID explanations
- Microsoft Learn: Deploy multiple Application Control policies
- Checkmk documentation: The agent for Windows
Installing the Checkmk agent on Azure Local when WDAC blocks the MSI
On an Azure Local cluster, the Checkmk agent could not be installed from its MSI package. The installer was launched with administrative privileges, the file existed, and the msiexec command looked correct—yet the agent did not appear as an installed application.
The cause was neither Checkmk nor a damaged MSI package. Azure Local was running its Application Control policy in enforced mode, which blocked untrusted code. The issue was resolved with a supplemental WDAC policy for the Checkmk agent while keeping the existing Azure Local base policy active.
Important: The commands in this article change the code-integrity configuration of a cluster. Use a maintenance window and have a tested recovery path. Audit mode permits code that enforced mode would block.
The symptoms
The unattended installation command itself was valid:
msiexec.exe /i "C:\WDAC\Checkmk\check-mk-agent_2.5.0p12.msi" /quiet /norestartAfter the command completed, however, the agent was not installed. Running it again with administrative privileges made no difference. Running the installer without /quiet at least displayed a more specific error:
The error message was: “The system administrator has set policies to prevent this installation.”
At this point, it is worth checking Application Control or Windows Defender Application Control (WDAC), not only the MSI log.
1. Check the WDAC state
Azure Local provides PowerShell cmdlets that show the policy mode and locally available policies:
Get-AsWdacPolicyMode

Get-ASLocalWDACPolicyInfo |
    Select-Object PolicyName, PolicyId, BasePolicyId, IsSignedPolicy, IsOnDisk, IsEnforced |
Format-Table -AutoSizeIf the mode is Enforced, WDAC can block the installation process or binaries launched by the installer.
Query the relevant events
Executables, DLLs, and drivers are typically recorded in the Code Integrity log. MSI and script events can appear in the AppLocker log. On Server Core, the AppLocker MSI and Script log may not exist.
$StartTime = (Get-Date).AddMinutes(-30)
$EventIds = 3076, 3077, 3089, 8028, 8029, 8038
$Logs = @(
    'Microsoft-Windows-CodeIntegrity/Operational'
    'Microsoft-Windows-AppLocker/MSI and Script'
)

foreach ($Log in $Logs) {
    if (-not (Get-WinEvent -ListLog $Log -ErrorAction SilentlyContinue)) {
        Write-Warning "Event log is not available: $Log"
        continue
    }

    Get-WinEvent -FilterHashtable @{
        LogName   = $Log
        StartTime = $StartTime
        Id        = $EventIds
    } -ErrorAction SilentlyContinue |
        Where-Object {
            $_.Message -match 'check[_-]?mk|cmk|msi'
        } |
        Sort-Object TimeCreated |
        Select-Object TimeCreated, Id, LevelDisplayName, Message |
        Format-List
}The most relevant IDs here are 3077 for a block in enforced mode and 3076 for its audit equivalent. For MSI and script control, pay particular attention to 8029 (block) and 8028 (audit).
2. Why use a supplemental policy?
Permanently disabling the Azure Local base policy is not a good solution. A supplemental policy adds a narrowly defined set of allowed code. The base and supplemental policies are evaluated together, so the Checkmk files do not have to be merged into Microsoft’s base policy.
The policy in this example uses publisher rules. If a file does not have a usable signature, -Fallback Hash creates a hash rule. That is intentionally restrictive: changed files receive new hashes, so a future agent upgrade may require an updated supplemental policy.
3. Switch to audit mode
This example changes the mode cluster-wide. Enable-AsWdacPolicy affects all cluster nodes. Verify the state on every node before continuing.
Get-AsWdacPolicyMode

Enable-AsWdacPolicy -Mode Audit
Start-Sleep -Seconds 180

Get-AsWdacPolicyModeMicrosoft notes that the change can take two to three minutes. Enable-ASLocalWDACPolicy is also available for a local-only test, but any deliberately different local policy state must be cleaned up afterward.
4. Install the agent on a reference node
Install the MSI while the policy is in audit mode. The complete PowerShell block below verifies the file and evaluates the msiexec exit code:
$MsiPath = 'C:\WDAC\Checkmk\check-mk-agent_2.5.0p12.msi'

if (-not (Test-Path -LiteralPath $MsiPath -PathType Leaf)) {
    throw "MSI file not found: $MsiPath"
}

$Arguments = @(
    '/i'
    "`"$MsiPath`""
    '/quiet'
    '/norestart'
)

$Process = Start-Process -FilePath 'msiexec.exe' `
    -ArgumentList $Arguments `
    -Wait `
    -PassThru

if ($Process.ExitCode -notin 0, 3010) {
    throw "Checkmk MSI installation failed with exit code $($Process.ExitCode)."
}

Get-Service |
    Where-Object { $_.Name -match 'check|cmk' -or $_.DisplayName -match 'checkmk' } |
Format-Table Status, Name, DisplayName -AutoSizeExit code 3010 means that the installation succeeded but requires a restart. Ensure that the agent is fully installed and tested before creating the policy.
5. Create and deploy the supplemental Checkmk policy
In the lab, Checkmk was installed below C:\Program Files (x86)\checkmk. Adjust the scan path to the actual installation. Scan only the required product directory—never scan all of C:\ or the complete Program Files tree.
$PolicyDirectory = 'C:\WDAC\Checkmk'
$ScanPath = 'C:\Program Files (x86)\checkmk'
$PolicyPath = Join-Path $PolicyDirectory 'Checkmk-Agent-Supplemental.xml'
$PolicyName = 'Checkmk Agent Supplemental Policy'
$PolicyVersion = '1.0.0.0'

New-Item -Path $PolicyDirectory -ItemType Directory -Force | Out-Null

if (-not (Test-Path -LiteralPath $ScanPath -PathType Container)) {
    throw "Checkmk installation directory not found: $ScanPath"
}

New-CIPolicy `
    -MultiplePolicyFormat `
    -Level Publisher `
    -Fallback Hash `
    -UserPEs `
    -ScanPath $ScanPath `
    -FilePath $PolicyPath

Set-CIPolicyVersion `
    -FilePath $PolicyPath `
    -Version $PolicyVersion

Set-CIPolicyIdInfo `
    -FilePath $PolicyPath `
    -PolicyID "Checkmk-Agent_$PolicyVersion" `
    -PolicyName $PolicyName

Add-ASWDACSupplementalPolicy -Path $PolicyPath

Get-ASLocalWDACPolicyInfo |
    Where-Object { $_.PolicyName -eq $PolicyName } |
Format-List PolicyName, PolicyId, BasePolicyId, IsSignedPolicy, IsOnDisk, IsEnforcedKeep the XML file under version control and document the matching agent version. The generated policy ID belongs to this environment and should not be copied blindly to another system.
6. Deploy and verify the supplemental policy on every cluster node
A successful installation on the reference node does not prove that the supplemental policy is active on every cluster node. In this lab, the Checkmk policy was initially present only on AZLHOST01. It was missing from AZLHOST02 and AZLHOST03 even though their base policies were already running in Enforced mode.
The existing XML file was therefore deployed again from AZLHOST01 with Add-ASWDACSupplementalPolicy. The cmdlet processes every cluster node. The script then checks the policy mode and queries the policy ID directly through CiTool on every node. Checking the ID is particularly useful when Get-ASLocalWDACPolicyInfo does not display a name for a custom policy.
$PolicyPath = 'C:\WDAC\Checkmk-2.5.0p12\Checkmk-Supplemental.xml'
$ExpectedPolicyId = 'd9c9bf97-3465-4afb-9714-b457f2341e61'
$ExpectedBasePolicyId = 'a6368f66-e2c9-4aa2-ab79-8743f6597683'
$ClusterNodes = @(
    'AZLHOST01'
    'AZLHOST02'
    'AZLHOST03'
)

if (-not (Test-Path -LiteralPath $PolicyPath -PathType Leaf)) {
    throw "WDAC policy file not found: $PolicyPath"
}

$PolicyContent = Get-Content -LiteralPath $PolicyPath -Raw

if ($PolicyContent -notmatch [regex]::Escape($ExpectedPolicyId)) {
    throw 'The XML does not contain the expected supplemental policy ID.'
}

if ($PolicyContent -notmatch [regex]::Escape($ExpectedBasePolicyId)) {
    throw 'The XML does not reference the expected Azure Local base policy.'
}

Add-ASWDACSupplementalPolicy `
    -Path $PolicyPath `
    -Verbose

Get-AsWdacPolicyMode

$PolicyStatus = Invoke-Command `
    -ComputerName $ClusterNodes `
    -ScriptBlock {
        param($PolicyId)

        $CiToolPath = Join-Path $env:SystemRoot 'System32\CiTool.exe'
        $PolicyInventory = & $CiToolPath -lp -json | ConvertFrom-Json

        $Policy = @(
            $PolicyInventory.Policies |
                Where-Object {
                    ([string]$_.PolicyID).Trim('{}') -ieq $PolicyId
                }
        ) | Select-Object -First 1

        [pscustomobject]@{
            Node         = $env:COMPUTERNAME
            PolicyFound  = $null -ne $Policy
            PolicyID     = $Policy.PolicyID
            BasePolicyID = $Policy.BasePolicyID
            IsOnDisk     = $Policy.IsOnDisk
            IsEnforced   = $Policy.IsEnforced
        }
    } `
    -ArgumentList $ExpectedPolicyId

$PolicyStatus |
    Select-Object Node, PolicyFound, PolicyID, BasePolicyID, IsOnDisk, IsEnforced |
    Format-Table -AutoSize

$MissingNodes = @(
    $PolicyStatus |
        Where-Object {
            -not $_.PolicyFound -or
            -not $_.IsOnDisk -or
            -not $_.IsEnforced
        }
)

if ($MissingNodes.Count -gt 0) {
    throw "The Checkmk supplemental policy is not active on every cluster node."
}For a successful deployment, the verbose output reports Refreshed and activated Code Integrity policy with status 0x0 for each newly updated node. The final table must show PolicyFound, IsOnDisk, and IsEnforced as True for every node. Only then should the Checkmk MSI be installed on the remaining nodes.
7. Return to enforced mode and test the installation
Once the supplemental policy is present on the nodes, return the base policy to enforced mode:
Enable-AsWdacPolicy -Mode Enforced
Start-Sleep -Seconds 180

Get-AsWdacPolicyMode

Get-ASLocalWDACPolicyInfo |
    Where-Object { $_.PolicyName -eq 'Checkmk Agent Supplemental Policy' } |
Format-List PolicyName, PolicyId, BasePolicyId, IsSignedPolicy, IsOnDisk, IsEnforcedNow perform the decisive test under Enforced: start the agent, check its status, and repeat the MSI installation on the remaining nodes. Only a successful test in enforced mode confirms that the supplemental policy is complete.
Get-Service |
    Where-Object { $_.Name -match 'check|cmk' -or $_.DisplayName -match 'checkmk' } |
    Format-Table Status, Name, DisplayName -AutoSize

$Controller = 'C:\Program Files (x86)\checkmk\service\cmk-agent-ctl.exe'
if (Test-Path -LiteralPath $Controller -PathType Leaf) {
    & $Controller status
}The result in the lab
In this cluster, the Azure Local base policy AS_Base_Policy remained active. Its policy ID was a6368f66-e2c9-4aa2-ab79-8743f6597683. It was supplemented by Checkmk Agent Supplemental Policy with policy ID d9c9bf97-3465-4afb-9714-b457f2341e61. The supplemental policy was reported as present on disk and enforced. The check-mk-agent_2.5.0p12.msi package could then be installed.
These GUIDs document this specific lab only. New policies receive their own IDs.
After installation: do not forget TCP/6556
A successful installation does not yet mean that the Checkmk server can reach the agent. The traditional Checkmk agent requires inbound TCP/6556. The installer normally creates a local firewall rule, but a suitable Group Policy rule may still be required in environments with centrally managed or restrictive firewall policies.
In the lab, inheritance was disabled on the Azure Local OU. A firewall GPO linked higher in the hierarchy therefore did not reach the servers. The TCP/6556 rule had to be linked directly to the server OU. Checkmk could connect to the agent after that change.
The firewall was a separate post-installation issue. It was not the reason why WDAC had previously blocked the MSI or its code.
What to consider for agent upgrades
- Document the policy XML together with the corresponding Checkmk version.
- Test new agent versions on a reference node under
Enforcedfirst. - If new block events appear, update and version the supplemental policy selectively.
- Use audit mode only for as long as necessary.
- Recheck the firewall GPO, OU link, and security filtering after changes.
Conclusion
If an MSI installation on Azure Local appears to finish without a result, include WDAC early in the investigation. Confirm the block in the event logs, install the software under controlled audit-mode conditions, generate a supplemental policy from the narrowly scoped installation directory, and then return to Enforced. This preserves the Azure Local security model while allowing the Checkmk agent explicitly.
Sources
- Microsoft Learn: Manage Application Control for Azure Local
- Microsoft Learn: Application Control event ID explanations
- Microsoft Learn: Deploy multiple Application Control policies
- Checkmk documentation: The agent for Windows