Vom 23. bis 25. April 2020 findet wieder das weltweite Global Azure Bootcamp statt. Im Rahmen des Azure Meetup Leipzig wollen wir am 24. April bei SoftwareOne / COMPAREX im Leipziger Norden ein Community-Event veranstalten. Details und Anmeldung dazu über Meetup:
Hinweis: Der Großteil des Artikels ist auch in meinem YouTube-Video zu diesem Thema enthalten:
Auf Grund vieler Nachfragen aus Community und Kunden habe ich mich dazu entschieden, dieses Thema etwas genauer zu beleuchten… Wenn man Azure in größerem Umfang nutzt, dann kommt schnell die Frage nach interner Kostenverrechnung („Innerbetriebliche Leistungsverrechnung“ / „Charge back“) oder zumindest der Möglichkeit, die Kosten den jeweiligen Verursachern zuzuordnen und transparent darzustellen. Ein wesentliches Hilfsmittel dafür ist das Tagging von Ressourcen. Klar, man könnte die Ressourcen auch nach Kostenstellen getrennt in unterschiedlichen Subscriptions unterbringen, das stößt in der Praxis aber schnell an Grenzen und auf Probleme.
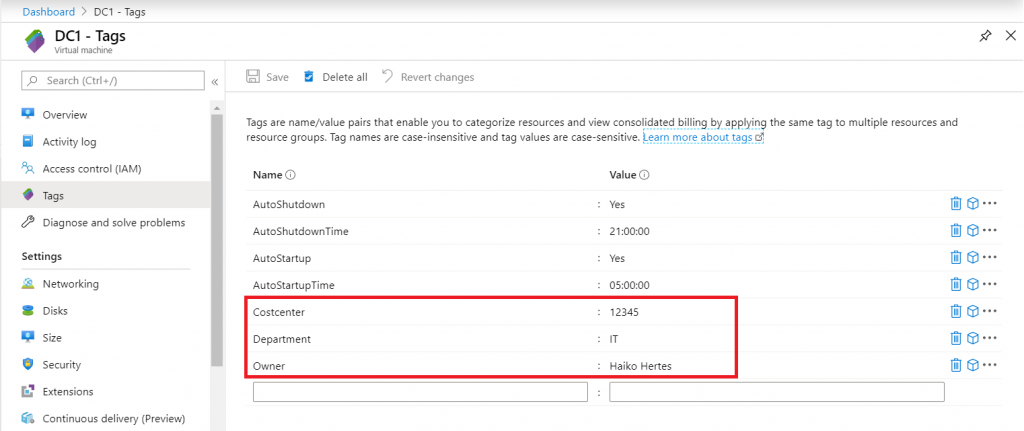
Hat man nun seine Ressourcen mit den entsprechenden Tags versehen, z.B. nach Besitzer („Owner“), Kostenstelle („Cost center“) oder Abteilung („Department“), dann tauchen diese Tags leider noch nicht in der regulären Rechnung auf.
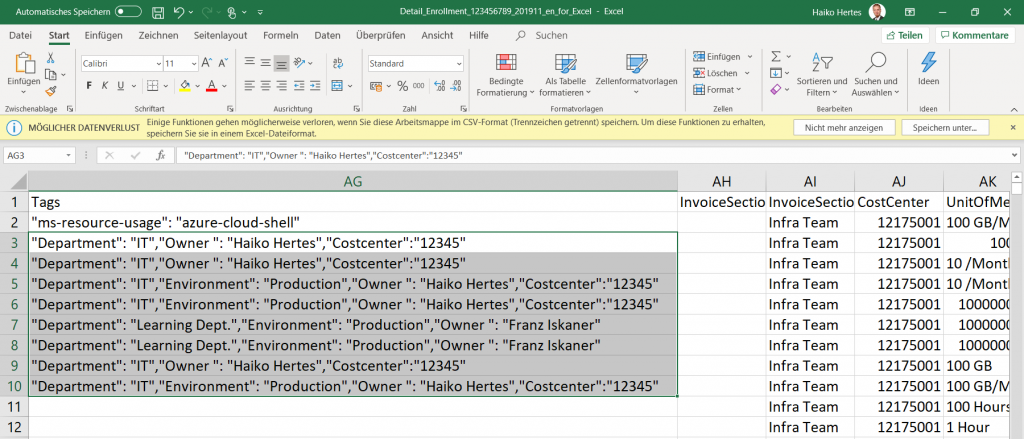
Nun kann man sich aus dem Azure Portal (oder auch aus dem EA / Enterprise Portal oder via REST API) eine Detail-Aufstellung der Kosten herunterladen. Dazu muss man zu „Cost Management + Billing“ / Billing-Scope auswählen / „Usage + Charges“ / Monat wählen / Download-Button klicken / Kurz warten / “ Usage Details Version 2″ auswählen. Diese „Usage Details“ enthalten dann auch die Tags. Allerdings: Selbst wenn man das CSV-File so umformatiert, dass Excel damit umgehen kann, ergibt sich noch ein Problem:
Die einzelnen Tags werden alle zusammen geworfen und in einer „Spalte“ vermischt. Damit ist das Suchen oder Filtern nach einzelnen Tags schon recht schwer – eine bestimmte Kombination aus Tags ist damit unmöglich zu filtern. Dazu müsste man die Tags jeweils in einzelnen Spalten ablegen. Und da kommt PowerShell und dessen Möglichkeit, mit dem JSON-Format umzugehen, ins Spiel! Ich habe eine Script geschrieben, was die Spalte in die einzelnen Tags aufteilt. Dabei werden auch gleich Zahlen und Daten in das lokale Format überführt.
# Script to expand tags from the usage details CSV provided by Azure / Microsoft# to filter usage by tags; also converts some numbers to local format# Download CSV file by hand first!# This is needed for the FileOpen Dialog
Add-Type-AssemblyName System.Windows.Forms
$FileBrowser=New-Object System.Windows.Forms.OpenFileDialog -Property@{
InitialDirectory =[Environment]::GetFolderPath('Desktop')Filter='CSV-Files (*.csv)|*.csv'}$null=$FileBrowser.ShowDialog()# Just to open the dialogIf($FileBrowser.FileName -eq""){Write-Verbose"No file selected - aborting."Break}$CSV=Import-Csv$FileBrowser.FileName -Delimiter","for($i=0; $i-lt$CSV.length; $i++){# Showing progressWrite-Progress-Activity"Expanding in Progress..."-Status"$([math]::truncate($i / $($CSV.length) * 100))% complete..."-PercentComplete $($i/ $($CSV.length)*100)# Converting dates and numbers to local format$CSV[$i].Date =[datetime]::ParseExact($CSV[$i].Date,'MM/dd/yyyy',$null).ToString("d")$CSV[$i].BillingPeriodStartDate =[datetime]::ParseExact($CSV[$i].BillingPeriodStartDate,'MM/dd/yyyy',$null).ToString("d")$CSV[$i].BillingPeriodEndDate =[datetime]::ParseExact($CSV[$i].BillingPeriodEndDate,'MM/dd/yyyy',$null).ToString("d")$CSV[$i].Quantity =[float]$CSV[$i].Quantity
$CSV[$i].EffectivePrice =[float]$CSV[$i].EffectivePrice
$CSV[$i].Cost =[float]$CSV[$i].Cost
$CSV[$i].UnitPrice =[float]$CSV[$i].UnitPrice
# Expand Tags$Tags="{ $($CSV[$i].Tags) }"| ConvertFrom-Json # We need to add some brackets here...if($Tags-ne$null){$Tags.PSObject.Properties |ForEach{$TagName="Tag-$($_.Name)"Add-Member-InputObject$CSV[$i]$TagName$_.Value
# Adding the heading - what a rhyme (; ...if($CSV[0].PSObject.Properties[$TagName]-eq$null){Add-Member-InputObject$CSV[0]$TagName$null-Force}}}}# Saving as Excel-readable CSV$CSV|Export-Csv"$([System.IO.Path]::GetDirectoryName($FileBrowser.FileName))\$([io.path]::GetFileNameWithoutExtension($FileBrowser.FileName))_expanded.csv"-NoTypeInformation-Delimiter";"
# Script to expand tags from the usage details CSV provided by Azure / Microsoft
# to filter usage by tags; also converts some numbers to local format
# Download CSV file by hand first!


# This is needed for the FileOpen Dialog
Add-Type -AssemblyName System.Windows.Forms
$FileBrowser = New-Object System.Windows.Forms.OpenFileDialog -Property @{
    InitialDirectory = [Environment]::GetFolderPath('Desktop')
    Filter = 'CSV-Files (*.csv)|*.csv'
}
$null = $FileBrowser.ShowDialog() # Just to open the dialog

If($FileBrowser.FileName -eq "")
{
    Write-Verbose "No file selected - aborting."
    Break
}

$CSV = Import-Csv $FileBrowser.FileName -Delimiter ","

for ($i=0; $i -lt $CSV.length; $i++)
{
    # Showing progress
    Write-Progress -Activity "Expanding in Progress..." -Status "$([math]::truncate($i / $($CSV.length) * 100))% complete..." -PercentComplete $($i / $($CSV.length) * 100)

    # Converting dates and numbers to local format
    $CSV[$i].Date = [datetime]::ParseExact( $CSV[$i].Date, 'MM/dd/yyyy', $null).ToString("d")
    $CSV[$i].BillingPeriodStartDate = [datetime]::ParseExact( $CSV[$i].BillingPeriodStartDate, 'MM/dd/yyyy', $null).ToString("d")
    $CSV[$i].BillingPeriodEndDate = [datetime]::ParseExact( $CSV[$i].BillingPeriodEndDate, 'MM/dd/yyyy', $null).ToString("d")
    $CSV[$i].Quantity = [float]$CSV[$i].Quantity
    $CSV[$i].EffectivePrice = [float]$CSV[$i].EffectivePrice
    $CSV[$i].Cost = [float]$CSV[$i].Cost
    $CSV[$i].UnitPrice = [float]$CSV[$i].UnitPrice


    # Expand Tags
    $Tags = "{ $($CSV[$i].Tags) }" | ConvertFrom-Json # We need to add some brackets here...
    if ($Tags -ne $null) {
         $Tags.PSObject.Properties | ForEach {
            $TagName = "Tag-$($_.Name)"
            Add-Member -InputObject $CSV[$i] $TagName $_.Value
            # Adding the heading - what a rhyme (; ...
            if ($CSV[0].PSObject.Properties[$TagName] -eq $null) {
                Add-Member -InputObject $CSV[0] $TagName $null -Force
            }
        }
    }

}

# Saving as Excel-readable CSV
$CSV | Export-Csv "$([System.IO.Path]::GetDirectoryName($FileBrowser.FileName))\$([io.path]::GetFileNameWithoutExtension($FileBrowser.FileName))_expanded.csv" -NoTypeInformation -Delimiter ";"
Das Script findet ihr natürlich auch auf meinem GitHub Repo:
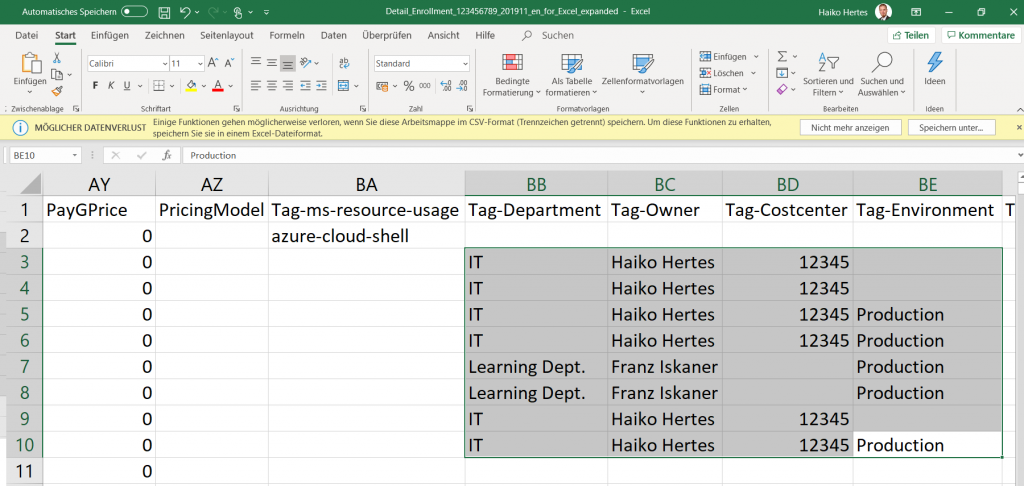
Das Resultat der Umwandlung wird dann in eine neue Excel-Datei im selben Folder wie die Originaldatei abgespeichert und kann dann problemlos in Excel geöffnet werden:
Wie man hier sieht sind die Tags nun in separaten Spalten untergebracht, so dass man sehr gut danach sortieren, darauf filtern oder mehr tun kann.
Ein regelmäßiges Problem im Azure-Alltag ist das Aufräumen nicht mehr benötigter Azure-Ressourcen. Diese kosten in der Regel unnötig Geld und stellen zum Teil auch ein (Sicherheits-)Risiko dar (wenn zum Beispiel eine nicht mehr verwendete VM aus dem Fokus gerät und über Jahre nicht gepatcht wird).
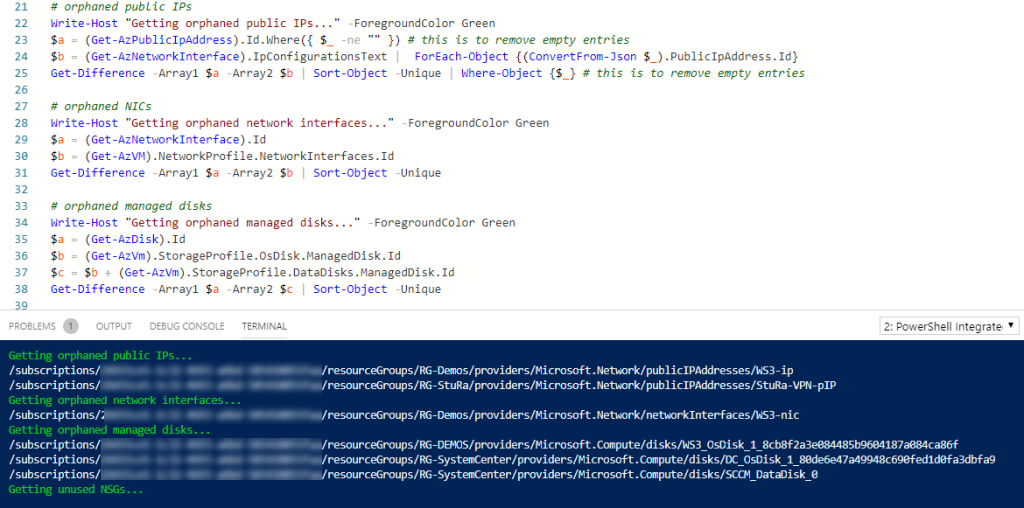
Um dieser Herausforderung zu begegnen gilt es zunächst, die Ressourcen, die „weg“ können, zu identifizieren. Dazu habe ich eine erste Version eines PowerShell Skriptes erstellt, welches:
Nicht verwendete Public IPs
Nicht verwendete NICs
Nicht verwendete NSGs
Nicht verwendete Managed Disks
findet und aufführt.
Über die Zeit möchte ich das Skript weiter ausbauen.
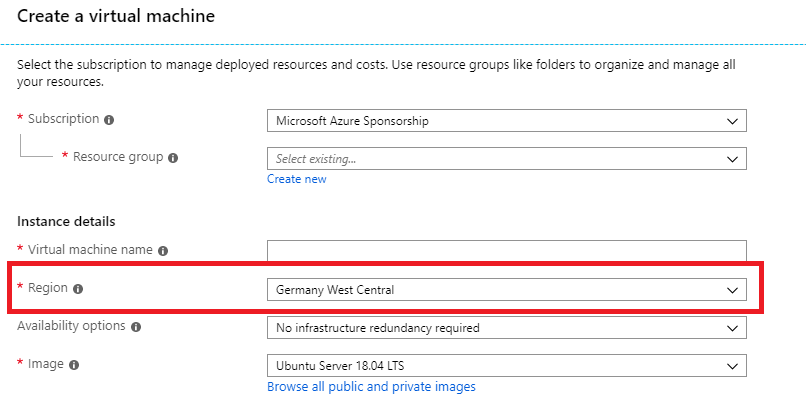
Microsoft hat heute (still und heimlich und ohne großes Event) die neuen Deutschen Rechenzentren für Azure freigeschalten. Man kann sie auch im Portal schon sehen/auswählen:
Allerdings ist diese Region bisher nur für ausgewählte Kunden nutzbar. Beim Versuch, eine Ressource dorthin bereit zu stellen, kommt derzeit noch ein Fehler:
Einem Beitrag von Microsoft selbst sind auch weitere Details zu entnehmen, auch, wann und wie es weitergeht:
In meinen Workshops und anderen Kundenterminen kommt immer wieder die Frage, wie man Virtuelle Maschinen in Azure nach Zeit gesteuert hoch- und wieder runterfahren kann. Das ist eigentlich ganz einfach – man benötigt dazu nur folgendes:
Einen Azure Automation Account
Ein PowerShell Runbook mit entsprechendem Skript
VMs mit den entsprechenden Tags
Ich habe mich dazu zu folgenden Tags entschieden:
AutoShutdown – Entscheidet, ob die VM automatisch heruntergefahren werden soll; kennt die Werte “Yes” and “No”
AutoShutdownTime – enthält die entsprechende Zeit für den Shutdown im Format HH:mm:ss nach UTC
AutoStartup – Entscheidet, ob die VM automatisch gestartet werden soll; kennt die Werte “Yes” and “No”
AutoStartupTime – enthält die entsprechende Zeit für den Start im Format HH:mm:ss nach UTC
Das PowerShell-Skript findet ihr in meinem GitHub Repo:
Das Skript ist etwas komplexer als die beiden anderen im Repo, berücksichtigt dabei aber auch, dass eine VM ggf. morgens heruntergefahren und abends gestartet werden soll.
Auf Youtube habe ich ein Video veröffentlicht, dass das Vorgehen mit anderen Skripten zeigt:
Für alle Interessierten gibt es hier die Slides und das Recording meiner gestrigen Session zu „DevOps mit OpenSource Tools“ auf dem Global Azure Bootcamp 2019:
Wer kommenden Samstag den 27. April 2019 noch nichts vor hat, dem sei das Global Azure Bootcamp, welches weltweit gleichzeitig an wahnsinnig vielen Orten stattfindet, nahegelegt.
Ich selbst werde in Jena sein, um beim dortigen Bootcamp über Opensource DevOps zu sprechen.
Die folgende Agenda mit spannenden Vorträgen erwartet euch dort:
10:00-10:15 Uhr – Begrüßung 10:15-11:15 Uhr – „Azure Governance – Das Regelwerk für Azure“ – Eric Berg 11:15-11:30 Uhr – Kaffeepause 11:30-12:30 Uhr – „Azure Kubernetes Services (AKS) und Azure DevOps“ – Mark Blume 12:30-13:00 Uhr – Mittag 13:00-14:00 Uhr – “Azure DevOps – aber in OpenSource” – Haiko Hertes 14:00-14:15 Uhr – Kaffeepause 14:15-15:15 Uhr – „Machine Learning in der Cloud mit Azure Machine Learning Service“ – Stefan Hellfritzsch
Wer mehr über das Global Azure Bootcamp und die anderen Locations erfahren möchte, der kann dies hier tun: https://global.azurebootcamp.net/
Ich würde mich freuen, das eine oder andere bekannte Gesicht in Jena zu sehen.
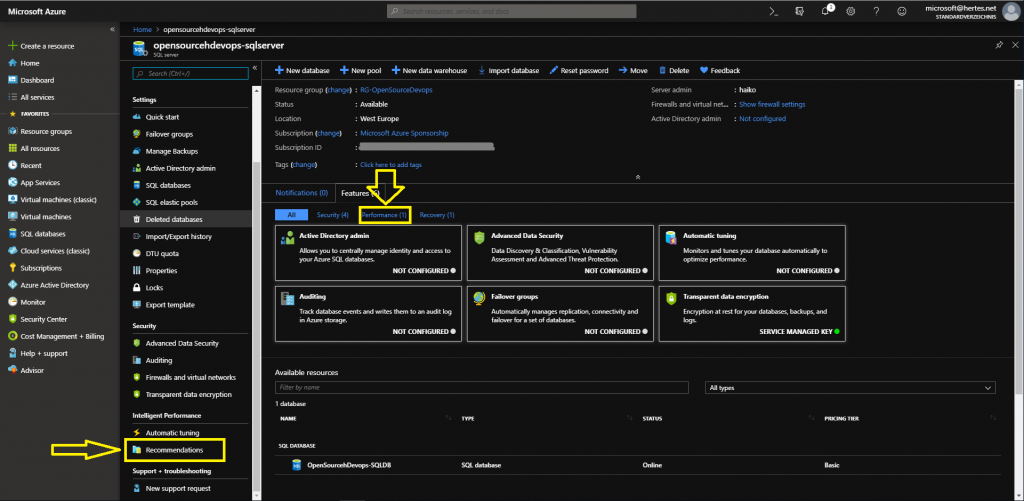
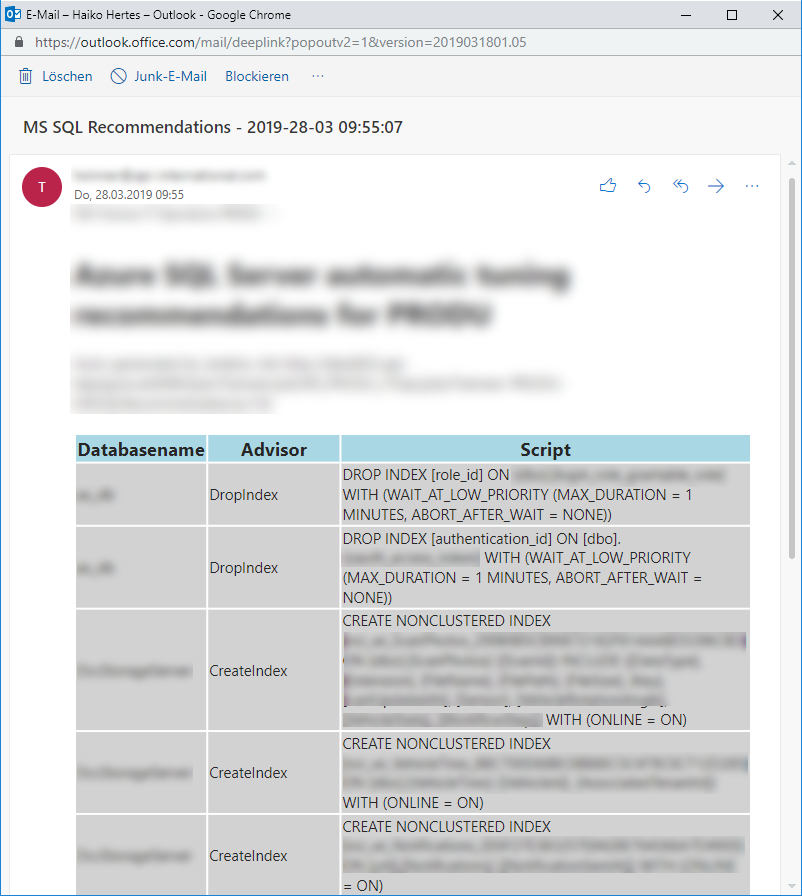
Azure und insbesondere Azure SQL ist klasse – es nimmt einem viele Dinge der täglichen Verwaltung ab, einiges davon sogar automatisch. Klar, das hat seinen Preis, immerhin ist Azure SQL nicht ganz billig, aber wenn man es schon bezahlt, dann kann man auch seine Fähigkeiten nutzen. Eine davon ist, automatisch anhand der Nutzung einer Datenbank Empfehlungen für die Leistungsoptimierung zu geben. Diese kann man sich im UI bzw. dem Azure Portal anschauen. Dazu öffnet man entweder links im Blade den Punkt „Recommondations“ unterhalb von „Intelligent Performance“ oder den Punkt „Performance“ auf der Main-Page bei den Notifications:
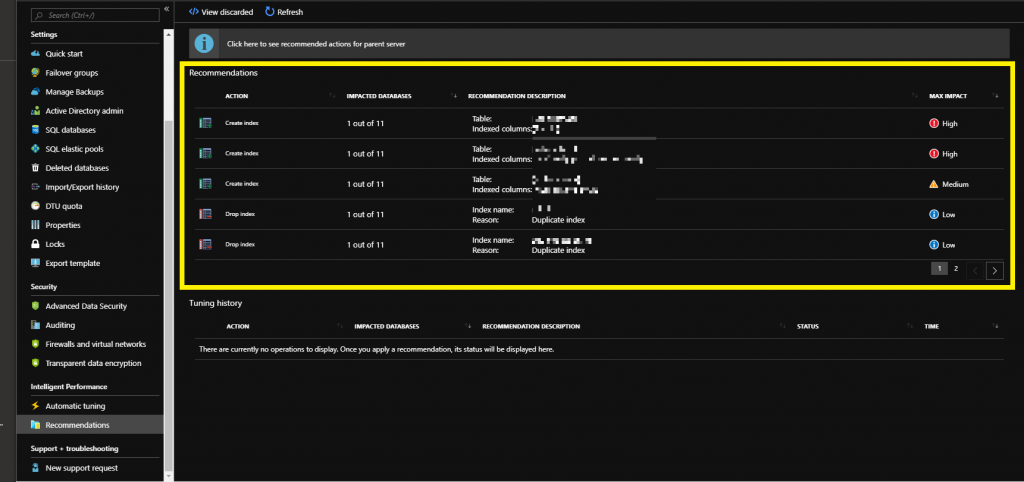
Dort sieht man dann einige Empfehlungen aufgeführt (vorausgesetzt, Azure hat etwas gefunden, was wiederum eine regelmäßige Nutzung der Datenbank voraussetzt):
Diese Daten kann man sich auch automatisch abrufen und auf Wunsch dann z.B. an die Entwickler verteilen. Dazu bediene ich mich einfach der PowerShell:
Dieses Script wiederum kann man dann z.B. per Jenkins regelmäßig auslösen. Oder alternativ ein Azure Automation Runbook dafür anlegen… Viel Spaß beim Ausprobieren!
Wie ihr ggf. dem ein- oder anderen Blog-Artikel hier entnehmen könnt, beschäftige ich mich seit einigen Monaten sowohl berufsbedingt als auch aus eigenem Interesse mit Microsoft Azure. Als logische Konsequenz daraus habe ich jetzt bereits einige erste YouTube Videos aus diesem Umfeld aufgezeichnet und veröffentlicht. Ihr findet diese hier:
Konkret geht es in den ersten Videos um ARM Templates und Azure CDN – weitere werden folgen! Schaut mal rein – ich freue mich auf Kommentare, Fragen und Likes!
Um dir ein optimales Erlebnis zu bieten, verwenden wir Technologien wie Cookies, um Geräteinformationen zu speichern und/oder darauf zuzugreifen. Wenn du diesen Technologien zustimmst, können wir Daten wie das Surfverhalten oder eindeutige IDs auf dieser Website verarbeiten. Wenn du deine Zustimmung nicht erteilst oder zurückziehst, können bestimmte Merkmale und Funktionen beeinträchtigt werden.
Funktional
Immer aktiv
Die technische Speicherung oder der Zugang ist unbedingt erforderlich für den rechtmäßigen Zweck, die Nutzung eines bestimmten Dienstes zu ermöglichen, der vom Teilnehmer oder Nutzer ausdrücklich gewünscht wird, oder für den alleinigen Zweck, die Übertragung einer Nachricht über ein elektronisches Kommunikationsnetz durchzuführen.
Vorlieben
Die technische Speicherung oder der Zugriff ist für den rechtmäßigen Zweck der Speicherung von Präferenzen erforderlich, die nicht vom Abonnenten oder Benutzer angefordert wurden.
Statistiken
Die technische Speicherung oder der Zugriff, der ausschließlich zu statistischen Zwecken erfolgt.Die technische Speicherung oder der Zugriff, der ausschließlich zu anonymen statistischen Zwecken verwendet wird. Ohne eine Vorladung, die freiwillige Zustimmung deines Internetdienstanbieters oder zusätzliche Aufzeichnungen von Dritten können die zu diesem Zweck gespeicherten oder abgerufenen Informationen allein in der Regel nicht dazu verwendet werden, dich zu identifizieren.
Marketing
Die technische Speicherung oder der Zugriff ist erforderlich, um Nutzerprofile zu erstellen, um Werbung zu versenden oder um den Nutzer auf einer Website oder über mehrere Websites hinweg zu ähnlichen Marketingzwecken zu verfolgen.