In meinen Workshops und anderen Kundenterminen kommt immer wieder die Frage, wie man Virtuelle Maschinen in Azure nach Zeit gesteuert hoch- und wieder runterfahren kann. Das ist eigentlich ganz einfach – man benötigt dazu nur folgendes:
Einen Azure Automation Account
Ein PowerShell Runbook mit entsprechendem Skript
VMs mit den entsprechenden Tags
Ich habe mich dazu zu folgenden Tags entschieden:
AutoShutdown – Entscheidet, ob die VM automatisch heruntergefahren werden soll; kennt die Werte “Yes” and “No”
AutoShutdownTime – enthält die entsprechende Zeit für den Shutdown im Format HH:mm:ss nach UTC
AutoStartup – Entscheidet, ob die VM automatisch gestartet werden soll; kennt die Werte “Yes” and “No”
AutoStartupTime – enthält die entsprechende Zeit für den Start im Format HH:mm:ss nach UTC
Das PowerShell-Skript findet ihr in meinem GitHub Repo:
Das Skript ist etwas komplexer als die beiden anderen im Repo, berücksichtigt dabei aber auch, dass eine VM ggf. morgens heruntergefahren und abends gestartet werden soll.
Auf Youtube habe ich ein Video veröffentlicht, dass das Vorgehen mit anderen Skripten zeigt:
Seit ein paar Stunden ist sie nun endlich verfügbar – die erste Preview-Version von PowerShell 7, genannt „PowerShell 7 Preview.1“. Sie kann wie üblich auf verschiedensten Wegen bezogen werden. Einer davon ist der direkte Download aus GitHub:
Also, dann viel Spaß beim Ausprobieren der neuen Version! Und denkt daran – Preview heisst, es gibt keinen Support und die Version sollte nicht produktiv eingesetzt werden!
Vor wenigen Tagen hat Steve Lee, Principal Software Engineer Manager für PowerShell, in einem umfangreichen Blog-Post dargestellt, wie es mit PowerShell weitergeht, und warum das nächste Release PowerShell 7 und nicht PowerShell 6.3 heißen wird. Die neue PowerShell Version wird dann auf .NET Core 3.0 basieren.
Im Post ist zu lesen, das abhängig von der Integration von PowerShell und .NET Core 3, eine erste Version von PowerShell 7 im Mai zu erwarten ist. Wir dürfen also gespannt sein!
Ich freue mich, dass ich eingeladen worden bin, auf der „Cloud and Datacenter Conference Germany“ in Hanau zu sprechen, und zwar konkret zum Thema „PowerShell – What’s new“. Wenn ihr es einrichten könnt, kommt am 21. u. 22. Mai nach Hanau, es gibt noch Tickets:
Seit heute ist die neueste Version von PowerShell, PowerShell Core 6.2, allgemein verfügbar.
Zur Installation, siehe hier: https://aka.ms/install-powershell
Neben Bugfixes, Performanceoptimierung und co. gibt es auch ein paar kleine Features, einige davon experimentell, z.B. die automatischen Empfehlungen für Cmdlets, falls die Eingabe falsch/unvollständig ist.
Mehr zu den Features findet ihr auf dem offizielen Microsoft Blog:
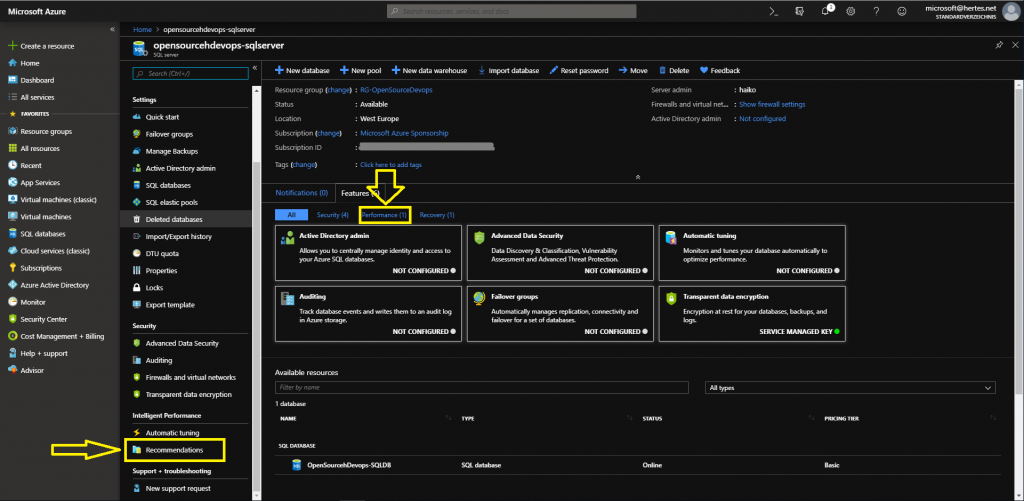
Azure und insbesondere Azure SQL ist klasse – es nimmt einem viele Dinge der täglichen Verwaltung ab, einiges davon sogar automatisch. Klar, das hat seinen Preis, immerhin ist Azure SQL nicht ganz billig, aber wenn man es schon bezahlt, dann kann man auch seine Fähigkeiten nutzen. Eine davon ist, automatisch anhand der Nutzung einer Datenbank Empfehlungen für die Leistungsoptimierung zu geben. Diese kann man sich im UI bzw. dem Azure Portal anschauen. Dazu öffnet man entweder links im Blade den Punkt „Recommondations“ unterhalb von „Intelligent Performance“ oder den Punkt „Performance“ auf der Main-Page bei den Notifications:
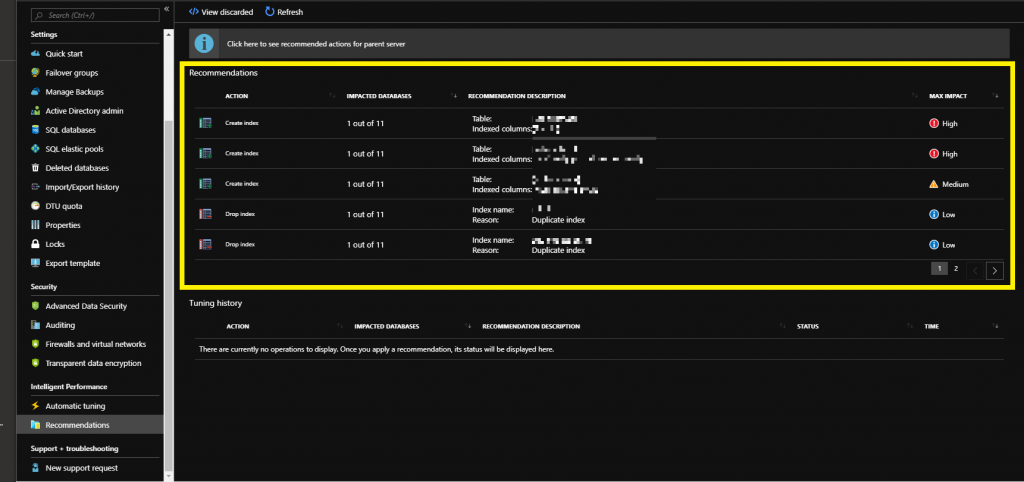
Dort sieht man dann einige Empfehlungen aufgeführt (vorausgesetzt, Azure hat etwas gefunden, was wiederum eine regelmäßige Nutzung der Datenbank voraussetzt):
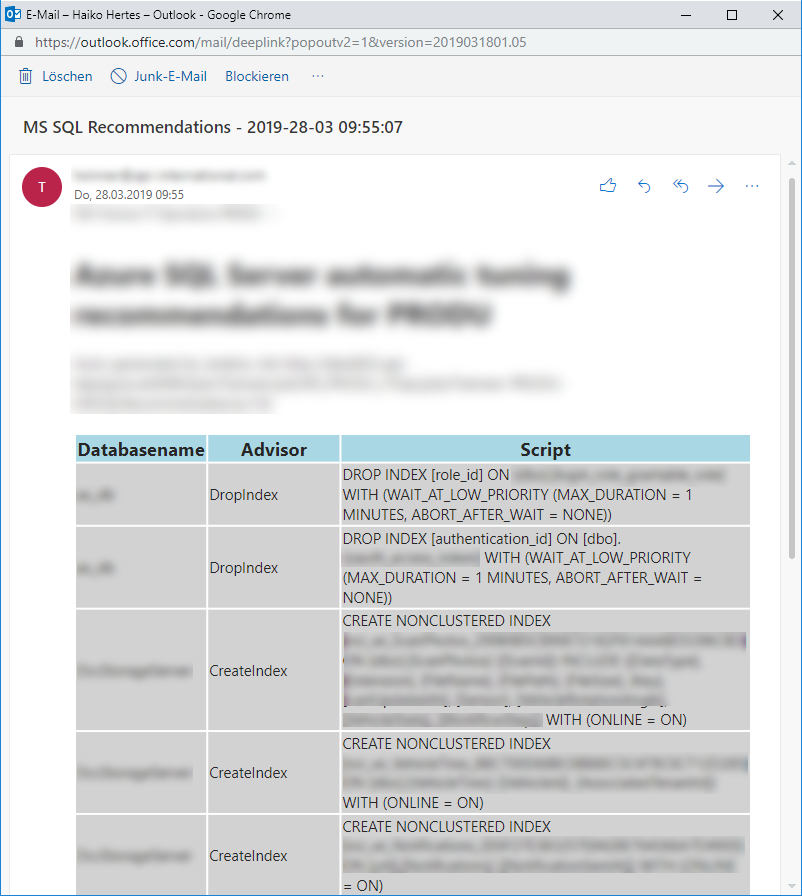
Diese Daten kann man sich auch automatisch abrufen und auf Wunsch dann z.B. an die Entwickler verteilen. Dazu bediene ich mich einfach der PowerShell:
Dieses Script wiederum kann man dann z.B. per Jenkins regelmäßig auslösen. Oder alternativ ein Azure Automation Runbook dafür anlegen… Viel Spaß beim Ausprobieren!
Jüngst wollte ich mir den Überblick über alle App Settings der vielen Web Apps, die wir einsetzen, und deren Werten verschaffen und dabei auch schauen, ob die Settings in allen Entwicklungs-Stages gleich bzw. analog passend sind. Dazu habe ich ein PowerShell Skript geschrieben, was alle Web Apps in allen aufgeführten Ressource Groups prüft und deren App Settings in ein gemeinsames CSV File exportiert:
# Adjust theese as needed# Change this to the subscription you want to query$SubscriptionId="1234567-890123-132312312"# Name the RG's here, that you want to check[string[]]$ResourceGroups="RG-A","RG-B","RG-C"### no changes needed below ###
Connect-AzureRmAccount -Subscription $SubscriptionId
Set-AzureRmContext -SubscriptionId $SubscriptionId$AllSettings=@()[string[]]$AllURLs=$null# Iterate over all RGsForeach($RGin$ResourceGroups){Write-Host"$RG..."# Get all WebApps in this RG$AllWebAppsInRG= Get-AzureRmWebApp -ResourceGroupName $RGForeach($WebAppin($AllWebAppsInRG)){Write-Host"$($WebApp.SiteName)..."$webAppObject= Get-AzureRmWebApp -ResourceGroupName $RG-Name $($WebApp.SiteName)$AppSettings=$webAppObject.SiteConfig.AppSettings
$AllURLs+=$WebApp.DefaultHostName
ForEach($Settingin$AppSettings){Write-Host"$($Setting.Name)"$SettingObject=New-Object PSCustomObject
$SettingObject|Add-Member-Type NoteProperty -Name"Ressource Group"-Value$RG$SettingObject|Add-Member-Type NoteProperty -Name"WebApp Name"-Value $($WebApp.SiteName)$SettingObject|Add-Member-Type NoteProperty -Name"WebApp URL"-Value $($WebApp.DefaultHostName)$SettingObject|Add-Member-Type NoteProperty -Name"Setting Name"-Value $($Setting.Name)$SettingObject|Add-Member-Type NoteProperty -Name"Setting Value"-Value $($Setting.Value)$AllSettings+=$SettingObject}}}$AllSettings| ConvertTo-Csv -Delimiter";"-NoTypeInformation|Out-File"AllAppSettings.csv"
# Adjust theese as needed

# Change this to the subscription you want to query
$SubscriptionId = "1234567-890123-132312312"

# Name the RG's here, that you want to check
[string[]]$ResourceGroups = "RG-A","RG-B","RG-C"

### no changes needed below ###

Connect-AzureRmAccount -Subscription $SubscriptionId
Set-AzureRmContext -SubscriptionId $SubscriptionId

$AllSettings = @()
[string[]]$AllURLs = $null

# Iterate over all RGs
Foreach($RG in $ResourceGroups)
{
    Write-Host "$RG..."
    # Get all WebApps in this RG
    $AllWebAppsInRG = Get-AzureRmWebApp -ResourceGroupName $RG
    Foreach($WebApp in ($AllWebAppsInRG))
    {
        Write-Host "$($WebApp.SiteName)..."
        $webAppObject = Get-AzureRmWebApp -ResourceGroupName $RG -Name $($WebApp.SiteName)
        $AppSettings = $webAppObject.SiteConfig.AppSettings
        $AllURLs += $WebApp.DefaultHostName

        ForEach($Setting in $AppSettings)
        {
            Write-Host "$($Setting.Name)"
            $SettingObject = New-Object PSCustomObject
            $SettingObject | Add-Member -Type NoteProperty -Name "Ressource Group" -Value $RG
            $SettingObject | Add-Member -Type NoteProperty -Name "WebApp Name" -Value $($WebApp.SiteName)
            $SettingObject | Add-Member -Type NoteProperty -Name "WebApp URL" -Value $($WebApp.DefaultHostName)
            $SettingObject | Add-Member -Type NoteProperty -Name "Setting Name" -Value $($Setting.Name)
            $SettingObject | Add-Member -Type NoteProperty -Name "Setting Value" -Value $($Setting.Value)
            $AllSettings += $SettingObject
        }

    }

}

$AllSettings | ConvertTo-Csv -Delimiter ";" -NoTypeInformation | Out-File "AllAppSettings.csv"
Danach sind die Settings alle in der Datei AllAppSettings im aktuellen Verzeichnis, und zwar so, dass man die Datei direkt in Excel öffnen kann. Viel Spaß beim Ausprobieren!
In Azure stellt jeder App Service Plan ab B1 (d.h., alle außer F1 “Free” und D1 “Shared”) SSL entweder mit einem von Azure generierten oder einem eigenen Zertifikat zur Verfügung:
Allerdings lassen die App Services auch weiterhin HTTP ohne SSL zu, es sei denn, man aktiviert die Option “HTTPS Only”:
Diese Option kann man natürlich auch per PowerShell und damit ganz bequem gleich für eine größere Menge App Services setzen. Dazu habe ich dieses Skript geschrieben:
# Adjust theese as needed$SubscriptionId="9feacb87-1fe6-447e-a0f4-4ae1ba2496e3"[string[]]$ResourceGroups="RG-A","RG-B","RG-C"### no changes needed below ###
Connect-AzureRmAccount -Subscription $SubscriptionId
Set-AzureRmContext -SubscriptionId $SubscriptionId# Iterate over all RGsForeach($RGin$ResourceGroups){Write-Host"$RG..."# Get all WebApps in this RG$AllWebAppsInRG= Get-AzureRmWebApp -ResourceGroupName $RGForeach($WebAppin$AllWebAppsInRG){Write-Host"$($WebApp.Name)..."# State before setting it:(Get-AzureRmWebApp -ResourceGroupName $RG-Name $($WebApp.Name)).HttpsOnly
# Enabling HttpsOnly
Set-AzureRmWebApp -ResourceGroupName $RG-Name $($WebApp.Name)-HttpsOnly $true}}
# Adjust theese as needed
$SubscriptionId = "9feacb87-1fe6-447e-a0f4-4ae1ba2496e3"
[string[]]$ResourceGroups = "RG-A","RG-B","RG-C"

### no changes needed below ###

Connect-AzureRmAccount -Subscription $SubscriptionId
Set-AzureRmContext -SubscriptionId $SubscriptionId

# Iterate over all RGs
Foreach($RG in $ResourceGroups)
{
    Write-Host "$RG..."
    # Get all WebApps in this RG
    $AllWebAppsInRG = Get-AzureRmWebApp -ResourceGroupName $RG
    Foreach($WebApp in $AllWebAppsInRG)
    {
        Write-Host "$($WebApp.Name)..."
        # State before setting it:
        (Get-AzureRmWebApp -ResourceGroupName $RG -Name $($WebApp.Name)).HttpsOnly
        # Enabling HttpsOnly
        Set-AzureRmWebApp -ResourceGroupName $RG -Name $($WebApp.Name) -HttpsOnly $true
    }
}
Insbesondere, wenn man viele App Settings (Umgebungsvariablen für eine Web App) in Azure verwendet und die Web App ein zweites Mal benötigt, z.B. um eine Test- oder Entwicklungs-Stage abzubilden, kann es sehr mühselig sein, die Settings zu übertragen. Hier bietet es sich an, diese per PowerShell zu kopieren. Voraussetzung dazu ist nur das Azure PowerShell RM Modul, welches man auf diesem Weg installieren kann:
Install-Module -Name AzureRM -AllowClobber
Dabei muss ggf. ein Sicherheitshinweis bestätigt werden. Wer das Modul schon installiert hat, muss natürlich nichts tun.
Zum Kopieren der Settings kann dann dieses Skript verwendet werden:
# Adjust theese as needed$SubscriptionId="123456-7890-1234-12132"$ResourceGroupSource="RG-Source"$ResourceGroupTarget="RG-Target"$WebAppSource="WebApp-Source"$WebAppTarget="WebApp-Target"### no changes needed below ###
Connect-AzureRmAccount -Subscription $SubscriptionId-Scope Process
Set-AzureRmContext -SubscriptionId $SubscriptionId$webAppSource= Get-AzureRmWebApp -ResourceGroupName $ResourceGroupSource-Name$WebAppSource# Get reference to the source app settings$AppSettingsSource=$WebAppSource.SiteConfig.AppSettings
# Create empty Hash table variable for App Settings$AppSettingsTarget=@{}# Copy over all existing App Settings to the Hash tableForEach($AppSettingSourcein$AppSettingsSource){$AppSettingsTarget[$AppSettingSource.Name]=$AppSettingSource.Value
}# Save strings to target Web App
Set-AzureRmWebApp -ResourceGroupName $ResourceGroupTarget-Name$WebAppTarget-AppSettings $AppSettingsTarget
# Adjust theese as needed

$SubscriptionId = "123456-7890-1234-12132"

$ResourceGroupSource = "RG-Source"
$ResourceGroupTarget = "RG-Target"

$WebAppSource = "WebApp-Source"
$WebAppTarget = "WebApp-Target"

### no changes needed below ###

Connect-AzureRmAccount -Subscription $SubscriptionId -Scope Process
Set-AzureRmContext -SubscriptionId $SubscriptionId

$webAppSource = Get-AzureRmWebApp -ResourceGroupName $ResourceGroupSource -Name $WebAppSource

# Get reference to the source app settings
$AppSettingsSource = $WebAppSource.SiteConfig.AppSettings

# Create empty Hash table variable for App Settings
$AppSettingsTarget = @{}

# Copy over all existing App Settings to the Hash table
ForEach ($AppSettingSource in $AppSettingsSource) {
    $AppSettingsTarget[$AppSettingSource.Name] = $AppSettingSource.Value
}

# Save strings to target Web App
Set-AzureRmWebApp -ResourceGroupName $ResourceGroupTarget -Name $WebAppTarget -AppSettings $AppSettingsTarget
Viel Spaß beim Ausprobieren – mir spart das immer wieder viel Arbeit!
Manchmal hat man den Bedarf, eine Objektliste gegen eine Liste von Ausdrücken zu filtern und dabei Wildcards zu verwenden, z.B. in dieser Form
[Alle Tiere – „Eisvogel“,“Hauspferd“,“Lisztaffe“,“Bergziege“] | Where-Object Name -in „*affe“,“*vogel“
Where-Object kann dabei ENTWEDER mit -in eine Liste verwenden ODER mit * Wildcards verwenden – beides zusammen geht (erstmal) nicht. Aber es gibt eine Lösung: Man muss die Liste der Wildcards zuerst expandieren, um die realen Werte dort drauf stehen zu haben. Das kann man z.B. so machen (am Beispiel von Verteilern):
1
2
3
4
5
6
$items= Get-DistributionGroup # Die Objektliste$search=@("*Finanzen*","*Einkauf*","*IT*")# Die Wildcard-Ausdrücke, nach denen gesucht wird$result=$search|Select-Object@{ Name="ExpandedItem"; Expression={$items-Like$_}}|Select-Object-ExpandProperty ExpandedItem -Unique
$result
$items = Get-DistributionGroup # Die Objektliste
$search = @("*Finanzen*","*Einkauf*","*IT*") # Die Wildcard-Ausdrücke, nach denen gesucht wird
$result = $search |
    Select-Object @{ Name="ExpandedItem"; Expression={ $items -Like $_ }} |
    Select-Object -ExpandProperty ExpandedItem -Unique
$result
Um dir ein optimales Erlebnis zu bieten, verwenden wir Technologien wie Cookies, um Geräteinformationen zu speichern und/oder darauf zuzugreifen. Wenn du diesen Technologien zustimmst, können wir Daten wie das Surfverhalten oder eindeutige IDs auf dieser Website verarbeiten. Wenn du deine Zustimmung nicht erteilst oder zurückziehst, können bestimmte Merkmale und Funktionen beeinträchtigt werden.
Funktional
Immer aktiv
Die technische Speicherung oder der Zugang ist unbedingt erforderlich für den rechtmäßigen Zweck, die Nutzung eines bestimmten Dienstes zu ermöglichen, der vom Teilnehmer oder Nutzer ausdrücklich gewünscht wird, oder für den alleinigen Zweck, die Übertragung einer Nachricht über ein elektronisches Kommunikationsnetz durchzuführen.
Vorlieben
Die technische Speicherung oder der Zugriff ist für den rechtmäßigen Zweck der Speicherung von Präferenzen erforderlich, die nicht vom Abonnenten oder Benutzer angefordert wurden.
Statistiken
Die technische Speicherung oder der Zugriff, der ausschließlich zu statistischen Zwecken erfolgt.Die technische Speicherung oder der Zugriff, der ausschließlich zu anonymen statistischen Zwecken verwendet wird. Ohne eine Vorladung, die freiwillige Zustimmung deines Internetdienstanbieters oder zusätzliche Aufzeichnungen von Dritten können die zu diesem Zweck gespeicherten oder abgerufenen Informationen allein in der Regel nicht dazu verwendet werden, dich zu identifizieren.
Marketing
Die technische Speicherung oder der Zugriff ist erforderlich, um Nutzerprofile zu erstellen, um Werbung zu versenden oder um den Nutzer auf einer Website oder über mehrere Websites hinweg zu ähnlichen Marketingzwecken zu verfolgen.